Top 5 App Development Trends to Watch Out (in 2023)

Top 5 app development trends to watch out for in 2023

The creation of mobile applications is expanding rapidly. Mobile developers are building solutions to assist new businesses in building IoT apps, mobile apps, on-demand apps, web apps, and much more. According to a study, the anticipated mobile app market volume by 2026 is $542.80 billion, with total revenue expected to expand at a CAGR of 6.58% yearly from 2022 to 2026. To keep your enterprise at the forefront of innovation in this fast-paced market, you must research the top mobile app development trends for 2023.

1. 5G

 The tremendous tussle between telecom operators like Reliance, Airtel, and other vendors over the 5G auction could only mean one thing. The demand for the upcoming 5G services across the globe is going to skyrocket. With low latency speed to faster data transfer, this technology is a boon to businesses and customers.

With the 5G networks, developers can build applications that
  • Enhance mobile streaming
  • Transform app functionality
  • Boost speed
  • Improve payment security
  • Enable AR and VR integration

2. AI and ML

With digital transformation widely pronounced among the customers, companies don’t have any other options but to embrace technologies that transform the customer experience. A plethora of use cases, including AI and ML in app development, influences the performance of the applications to a great extent. Of all, it’s AI and its subset ML grabbing businesses’ attention.

With AI and ML-enabled applications, developers can
  • Ensure personalization
  • Study massive amounts of historical data of customers
  • Adapt to user behaviors
  • Enable voice optimization
  • Develop and deploy apps innovatively

3. Internet of Things 

If I have to talk about a technology that is touching the lives of everyone and simplifying their day-to-day routines, then it should be the Internet of Things or IoT. Technology is a massive revelation to every industry. And app developers are no exception to this. They must consider emerging technology to improve their application standards and user experience.

With IoT, app developers can
  • Ensure greater customization
  • Create more hybrid applications
  • Gain valuable insights
  • Enter niche markets
  • Reduce costs of developmen

4. AR/VR (Augmented Reality/Virtual Reality)

The advent of AR and VR has transformed the experience of users remarkably. Both these technologies provide immersive experiences to customers resulting in better sales. And app developers must consider emerging technologies to improve the personalization efforts of businesses.

With AR and VR, app developers can
  • Increase in-store experience
  • Location-based app experience
  • Create an innovative learning experience
  • Increase revenue of retail chains
  • Offer discounts and freebies

5. Chatbots 

Today, almost all mobile apps have chatbots, and discarding the technology could hurt the revenue of any business. Developers must focus on the influence chatbots have on mobile app development and develop applications that help users engage and enjoy a stress-free life.

With chatbot-enabled mobile app, developers can
  • Engage users better
  • Analyze data and metrics exclusively
  • Save tons of time and money
  • Improve user experience
  • Help users 24/7

These are not the only trends creating ripples in the application development space. In fact, there are a lot of considerations. I have listed only a few that are hot and trendy in the market.

SB- way2smile | hakunamatatatech

【重要】LINE公式アカウント 料金プラン改定及び日割り廃止のお知らせ

LINE株式会社(本社:東京都新宿区、代表取締役社長:出澤 剛)は、当社が提供する企業・店舗向けLINEアカウント「LINE公式アカウント」において、今後さらに企業・店舗とユーザーとの接点強化や双方向の深い繋がりを生み出せるサービスを目指し、2023年6月(予定)に料金プランの改定を行いますので、お知らせいたします。

※今回の料金プラン改定の発表および適用のサービス対象国は、日本のみとなります。
※プラン改定に伴い2023年2月1日より現プラン料金の日割り適用を廃止いたします。

概要および背景

「LINE公式アカウント」は、企業や店舗がユーザーにとって「本当に欲しい情報」を届けることで、ユーザーひとりひとりに最適化された双方向のコミュニケーションサービスを目指しています。
しかし、メッセージの一斉配信などによる一方的なコミュニケーションが多くなっていたことが、課題となっていました。このような課題を解決するため、これまで、企業や店舗がよりユーザーひとりひとりの興味や関心に合ったメッセージを届けられるよう、ユーザーの属性/行動に応じたメッセージ配信の多様化・高度化など、さまざまな機能追加・アップデートを行なってきました。

さらに、今後は企業・店舗とユーザーとの双方向の深い繋がりを生み出せるサービスを目指し、下記のような取り組みを進めていきます。

  • 「LINE公式アカウント」上のサービス利用情報やアンケート結果などのユーザーデータとの紐づけ※による、より高度なメッセージ配信の最適化
  • PayPayやYahoo!JAPANなどのZHDグループ各社サービスとの連携によるユーザー接点の強化
  • 業種特化型パッケージプランの提供※全てユーザー許諾済みのデータ

このような今後の活用の方向性を見据え、2023年6月(予定)に「LINE公式アカウント」の料金プランを改定する予定です。

また、プラン改定に伴い2023年2月1日より現プラン料金の日割り適用を廃止いたします。今まで、フリープランからライトプラン、フリープランからスタンダードプランに変更した場合、変更月は日割りが発生しておりましたが、2023年2月1日からは、日割りではなく満額のご請求になります。

変更内容

新料金プラン

2023年6月(予定)からは新たに、One to Oneチャットを主に利用することで、ユーザーひとりひとりとの個別コミュニケーションを目的とした「コミュニケーションプラン」、友だち数増加によるユーザー全体への情報発信やリーチを目的とした「ライトプラン」「スタンダードプラン」など、目的別にプランを選択し、ご活用いただくことが可能です。
※無料メッセージについて
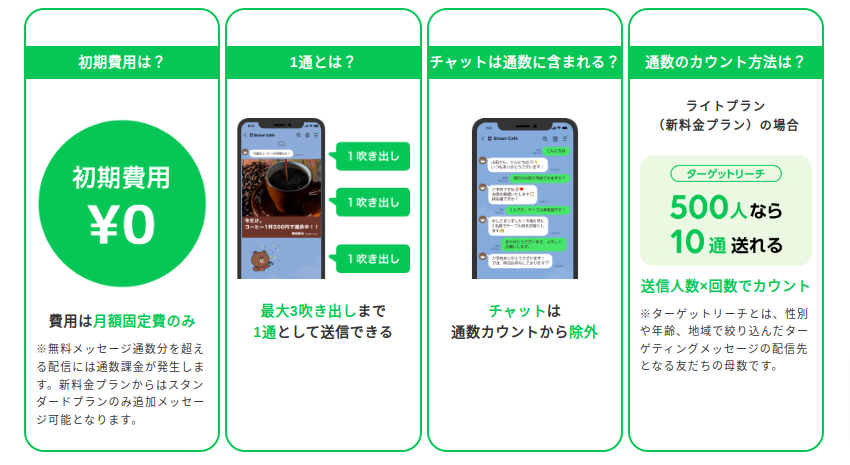
無料メッセージは「メッセージ配信」の通数が対象です。チャットでのメッセージ通数は現プランと同様対象外となり、通数制限はございません。

課金対象となるメッセージについて

LINE公式アカウントではさまざまなメッセージ機能がありますが、すべてのメッセージ配信が課金対象としてカウントされるわけではありません。LINEチャットの送受信や自動応答メッセージなど、一部のメッセージ配信は無料で活用できます。

【カウントされるメッセージ】

・メッセージ配信(絞り込み配信,ステップ配信含む)

・Messaging APIの「Push API」「Multicast API」「Broadcast API」「Narrowcast API」

 【カウントされないメッセージ】

・LINEチャットの送受信

・応答メッセージ

・AI応答メッセージ

・あいさつメッセージ

・Messaging APIの「Reply API」

現行プラン

フリープランライトプランスタンダードプラン
月額固定費(税別)0円5,000円15,000円
無料メッセージ通数
(月)
1,000通15,000通45,000通
追加メッセージ料金
(税別)
不可5円/通~3円/通

※現行の料金プランに関して詳細はこちら:https://www.linebiz.com/jp/service/line-official-account/plan/

基本機能

基本機能は現行プランと変更なく、引き続きご利用いただけます。

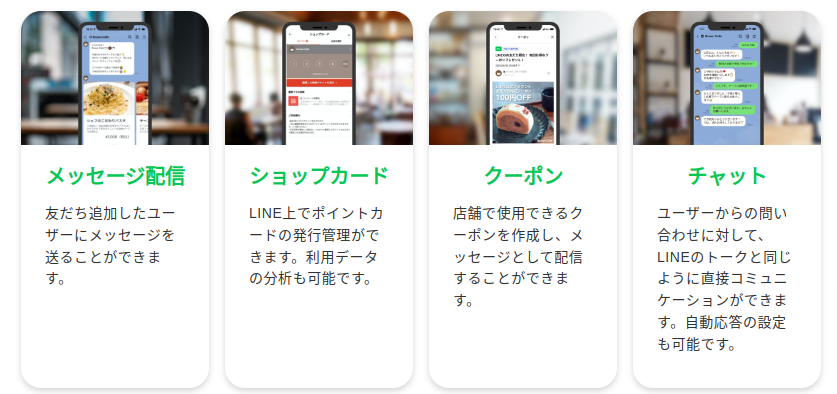
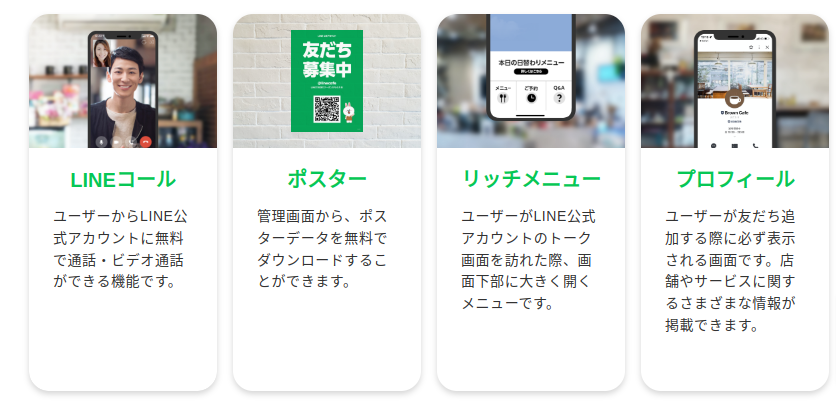
便利な機能が充実

新料金プランの適用について

料金プラン改定日時点で利用中の「LINE公式アカウント」については、その時点で利用中または選択中の現行の料金プランに相当する新料金プランが自動的に適用される予定です。詳細につきましては2023年2月頃に改めてご案内します。

現行のプラン適用される新料金プラン
フリープランコミュニケーションプラン
ライトプランライトプラン
スタンダードプランスタンダードプラン

※現行の料金プランに関して詳細はこちら:https://www.linebiz.com/jp/service/line-official-account/plan/

月中にアップグレードをする場合

月中でのプランアップグレードに関しては、現行は申請いただいた次月から適用しておりましたが、プラン改定後は差額をお支払いいただくことで月中から適用し、差分の通数を付与いたします。

月中にダウングレードをする場合

月中でのプランダウングレードに関しては、現行と同様に申請いただいた次月から適用いたします。

ライトプランで追加メッセージを配信する場合

現行はライトプランをご利用でも従量課金で追加メッセージを配信いただけましたが、プラン改定後はスタンダードプランへのアップグレードをしていただくことでご利用いただけます。

日割り適用廃止について

フリープランからライトプラン、フリープランからスタンダードプランに変更した場合、変更月は日割り金額をお支払いいただき、付帯する無料メッセージ通数も日割りとなっておりましたが、2023年2月1日からは変更月も日割りではなく月額費満額のご請求となり、無料メッセージも全数付与とさせていただきます。

LINE株式会社では、今後も様々なメニュー提供やサービスの改善を継続的に実現することで、企業とユーザーの双方にとって価値のある情報接点を提供し、コミュニケーションプラットフォームとして多様な活用の可能性を広げていきます。

Source By : linebiz.com

LINEの新サービス「LINEミニアプリ」(LINE Mini app)をご存知ですか?

月間アクティブユーザー9,200万人以上!
LINEの新サービス「LINEミニアプリ」(LINE Mini app)をご存知ですか?

サービス運営や店舗経営をしている事業者の方、LINEユーザーの方は知っておいて損はない「LINEミニプリ」をご紹介します。

「LINEミニアプリ」が注目される背景には従来のアプリのデメリットがあります。

【従来のアプリのデメリット】
・App StoreやGoogle Playからダウンロードしなくてはいけない
・ネイティブアプリ市場の飽和によりダウンロードのハードルが上がっている
・スマートフォンのアプリアイコンも増える
・ストレージがいっぱいになると削除しないといけない

「LINEミニアプリ」は、LINEの中で提供されている企業向けサービスのため、こういったユーザーのデメリットをカバーできる特徴があります。

さらにミニアプリには事業者側・ユーザー側双方にメリットがあります。

【事業者のメリット】
・ミニアプリとしてリリースしたほうがユーザーに使ってもらいやすい
・アプリ開発の莫大な費用がかからずコストが抑えられる
・LINE内で展開するのでアンインストールされずらい
・ポイントカードやクーポン・会員証など自社アプリに似た必要な機能はそのまま使える
・LINE友だちへの拡散も期待できる

【ユーザーのメリット】
・LINE内で利用できるのでダウンロードの必要がない
・スマートフォンの容量を消費しない
・手軽でアイコンも一つにできる
・ポイントカードやクーポン・会員証など自社アプリに近い機能を利用できる
・LINE友だちと共有できる

【LINEミニアプリの今後の展望】
LINEミニアプリは、デジタルサービスに抵抗のあるユーザーでも、LINEからミニアプリを利用できるため、利用ハードルを下げます。


一方で、従来のネイティブアプリも状況やターゲット、独自機能を盛り込む場合には今後も必用になります。


企業は、自社に最適なアプリの活用方法を選ぶ必要があります。
LINEミニアプリは事業者、ユーザーともにメリットが大きいため、今後市場はますます大きくなることが予想されます。

ここまで、今注目されている「LINEミニアプリ」についてご紹介させていただきました。
店舗や企業のアプリに代わる新たな顧客接点として利用が広がっていきそうです。
今後、企業の集客・販促ツールとしてブームが起こりそうな予感がしますので、とくに集客面でお悩みの経営者様はチェックしておきましょう。

LINEミニアプリならWeCode|www.wecode-inc.com

What is Micro-Frontends(MFEs)?

MFEs — microservices approach for modern web.

What is Micro Frontends?

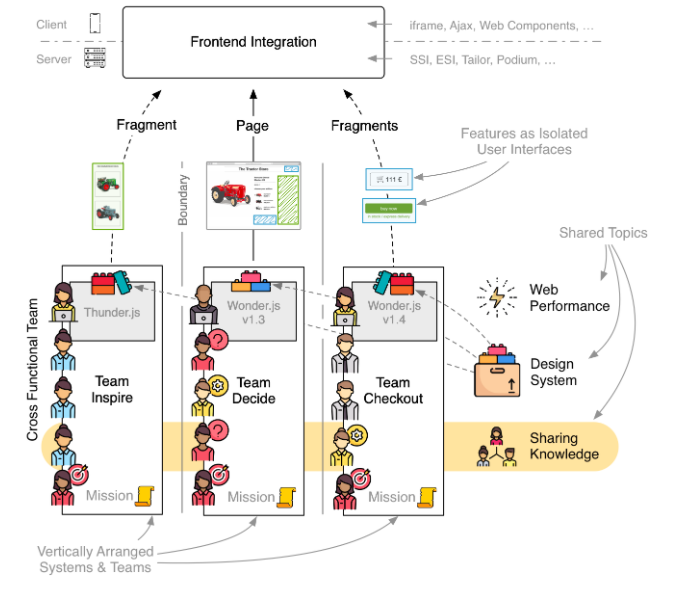
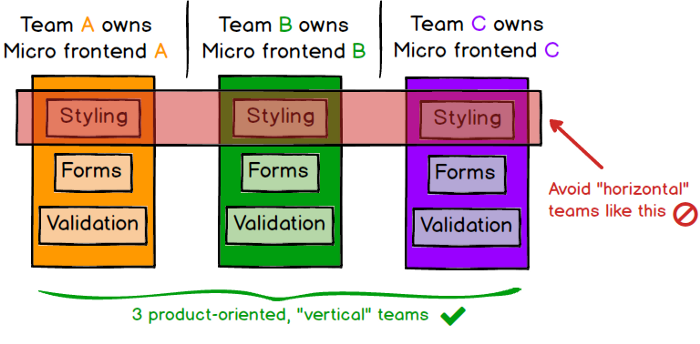
The idea behind Micro Frontends is to think about a website or web app as a composition of features which are owned by independent teams. Each team has a distinct area of business or mission it cares about and specialises in. A team is cross functional and develops its features end-to-end, from database to user interface.

“An architectural style where independently deliverable frontend applications are composed into a greater whole”

In ThoughtsWorks — Technology Radar May 2020 Techniques, MFEs are in “Adopt” stage.

https://www.thoughtworks.com/radar/techniques/micro-frontends

We’ve seen significant benefits from introducing microservices, which have allowed teams to scale the delivery of independently deployed and maintained services. Unfortunately, we’ve also seen many teams create a front-end monolith — a large, entangled browser application that sits on top of the back-end services — largely neutralizing the benefits of microservicesMicro frontends have continued to gain in popularity since they were first introduced.

Pros:

  • Incremental upgrades
  • Multiple teams contribute to the frontend
  • Simple & Decoupled codebases
  • Development speed should be a constant despite a growing application
  • External developers should be able to extend the UI
  • Different teams should be able to use their own tooling (Technology Agnostic)

May be you have done Angular vs React vs VueJS but now we talking about — Angular + React +VueJS — how they can work together.

Cons:

Micro frontends are not perfect for every project. They are a solution for scaling development. If you only have a hand full of developers and communication is no issue the introduction of micro frontends won’t bring much value.

  • Increased Payload size
  • Environment differences
  • Operational and governance complexity
  • Works best for big teams (hundreds of developer)
  • No global standards of development

Implementation example 1:

https://micro-frontends.org/1-composition-client-only/

Code at,

https://github.com/neuland/micro-frontends/tree/master/1-composition-client-only

Implementation example 2:

https://demo.microfrontends.com/

Code at,

https://github.com/micro-frontends-demo

A JavaScript framework for front-end microservices:
https://github.com/single-spa/single-spa

Build micro frontends that coexist and can (but don’t need to) be written with their own framework. This allows you to:

  • Use multiple frameworks on the same page without refreshing the page (React, AngularJS, Angular, Ember, or whatever you’re using)
  • Write new code, possibly with a new framework, without rewriting your existing app
  • Lazy load code for improved initial load time.

Micro frontends are indeed quite popular in the e-commerce sector. In 2012 the Otto Group, a Germany based mail order company and one of the world’s largest e-commerce players started to split up its monolith. The Swedish furniture company IKEA and Zalando, one of Europes biggest fashion retailers, moved to this model. Thalia, a German bookstore chain, rebuilt its e-reader store into vertical slices to increase development speed.

But micro frontends are also used in other industries. Spotify organizes itself in autonomous end-to-end teams they call Squads. Canopy, an American tax software startup and the sports streaming service DAZN use micro frontends to build its applications.

Conclusion:

Microfrontends are sections of your UI, often consisting of dozens of components, that use frameworks like React, Vue, and Angular to render their components. Each microfrontend can be managed by a different team and may be implemented using its own framework. It is practical and suggested to use just one framework for all your microfrontends, although you may add additional frameworks when migrating or when experimenting.

We see it as a proven approach that we should be using when it makes sense to do so.

Source : Medium

What is WebAssembly (wasm)?

WebAssembly is a new type of code that can be run in modern web browsers — it is a low-level assembly-like language with a compact binary format that runs with near-native performance and provides languages such as C/C++, C# and Rust with a compilation target so that they can run on the web.

WebAssembly is designed to complement and run alongside JavaScript — using the WebAssembly JavaScript APIs, you can load WebAssembly modules into a JavaScript app and share functionality between the two. This allows you to take advantage of WebAssembly’s performance and power and JavaScript’s expressiveness and flexibility in the same apps, even if you don’t know how to write WebAssembly code.

Now, if you have programs in C/C++ or Rust etc. now you can run those programs on the web with help of WebAssembly alongside JavaScript. You can also develop WebAssembly using AssemblyScript (A language made for WebAssembly).

https://www.assemblyscript.org/

Now these has opened doors for running complex programs written in “low-level assembly-like language” on web.

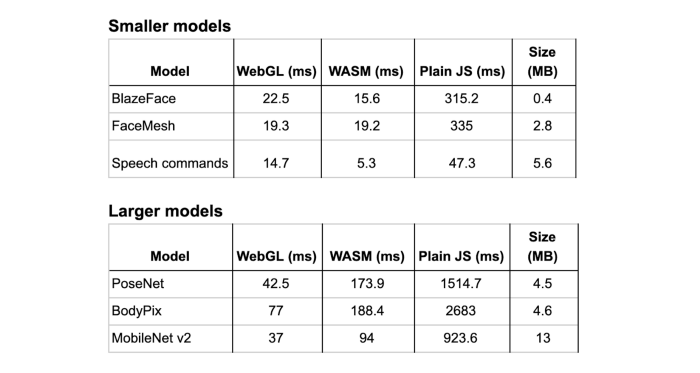
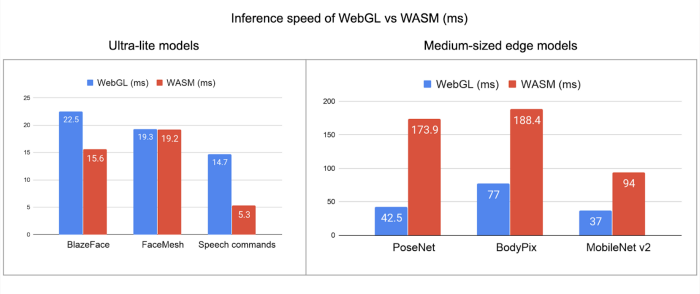
We are already seeing some interesting use cases of WebAssembly, Like TensorFlow has announced — WebAssembly backend for TensorFlow.js (more details here)

TensorFlow WASM backend Performance data

One more interesting example of WebAssembly could be — A WebAssembly Powered Augmented Reality Sudoku Solver.

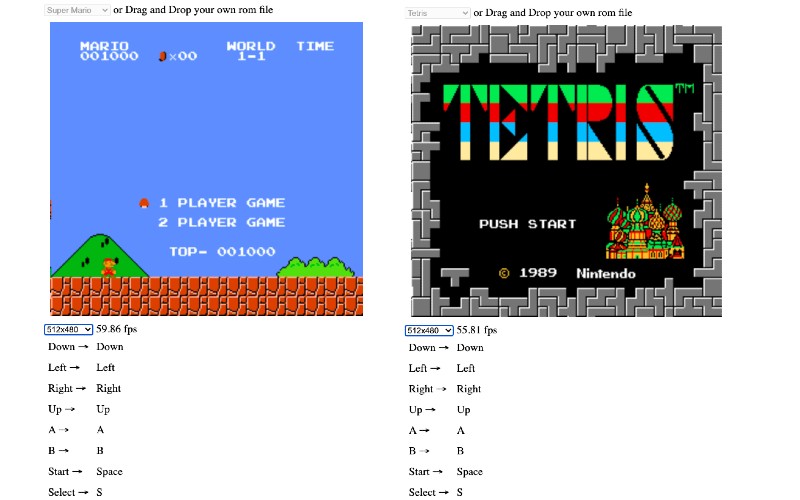
In our example using WebAssembly NES emulator and run Super Mario Brothers and Tetris game in our web browser.

TL;DR Use docker image:

$ docker pull bhargavshah86/rust-wasm-demo:1.0.0
$ docker run --name rust-wasm-demo -d -p 8080:80 bhargavshah86/rust-wasm-demo:1.0.0$ # http://localhost:8080/wasm_rust_demo.html

Manual steps:

  1. Download WebAssembly NES emulator (nes_rust_wasm.js and nes_rust_wasm_bg.wasm)
  2. Download ROM files,
  • Super_mario_brothers.nes
  • Tetris.nes

3. HTML and JS code to glue in all parts together

<html>
  <head>
    <meta content="text/html;charset=utf-8" http-equiv="Content-Type"/>
    <style>
    canvas {
      background: #000;
      margin: 10px;
    }
    .actual {
      width: 256;
      height: 240;
    }
    .double {
      width: 512;
      height: 480;
    }
    .quadruple {
      width: 1024;
      height: 960;
    }
    td { 
    padding: 5px;
}

    </style>
  </head>
  <body>
    <script type="module">
      import init, { WasmNes, Button } from './nes_rust_wasm.js';

      const setupAudio = (wasm, nes) => {
        const audioContext = AudioContext || webkitAudioContext;

        if (audioContext === undefined) {
          throw new Error('This browser seems not to support AudioContext.');
        }

        const bufferLength = 4096;
        const context = new audioContext({sampleRate: 44100});
        const scriptProcessor = context.createScriptProcessor(bufferLength, 0, 1);

        scriptProcessor.onaudioprocess = e => {
          const data = e.outputBuffer.getChannelData(0);
          nes.update_sample_buffer(data);
          // Adjust volume
          for (let i = 0; i < data.length; i++) {
            data[i] *= 0.25;
          }
        };

        scriptProcessor.connect(context.destination);
      };

      const start = romArrayBuffer => {
        // @TODO: Call init beforehand
        init()
          .then(wasm => run(wasm, new Uint8Array(romArrayBuffer)))
          .catch(error => console.error(error));
      };

      const run = (wasm, romContentArray) => {
        const width = 256;
        const height = 240;
        const canvas = document.getElementById('nesCanvas');
        const ctx = canvas.getContext('2d');
        const imageData = ctx.createImageData(width, height);
        const pixels = new Uint8Array(imageData.data.buffer);
        const nes = WasmNes.new();
        nes.set_rom(romContentArray);
        setupAudio(wasm, nes);
        nes.bootup();

        // FPS counter

        let totalElapsedTime = 0.0;
        let previousTime = performance.now();
        let frameCount = 0;
        const fpsSpan = document.getElementById('fpsSpan');

        const countFps = () => {
          frameCount++;
          const currentTime = performance.now();
          const elapsedTime = currentTime - previousTime;
          totalElapsedTime += elapsedTime;
          previousTime = currentTime;
          if ((frameCount % 60) === 0) {
            fpsSpan.textContent = (1000.0 / (totalElapsedTime / 60)).toFixed(2);
            totalElapsedTime = 0.0;
            frameCount = 0;
          }
        }

        // animation frame loop

        const stepFrame = () => {
          requestAnimationFrame(stepFrame);
          countFps();
          nes.step_frame();
          nes.update_pixels(pixels);
          ctx.putImageData(imageData, 0, 0);
        };

        // joypad event listener setup

        // @TODO: Mapping should be configurable
        const getButton = keyCode => {
          switch (keyCode) {
            case 32: // space
              return Button.Start;
            case 37: // Left
              return Button.Joypad1Left;
            case 38: // Up
              return Button.Joypad1Up;
            case 39: // Right
              return Button.Joypad1Right;
            case 40: // Down
              return Button.Joypad1Down;
            case 50: // 2
              return Button.Joypad2Down;
            case 52: // 4
              return Button.Joypad2Left;
            case 54: // 6
              return Button.Joypad2Right;
            case 56: // 8
              return Button.Joypad2Up;
            case 65: // A
              return Button.Joypad1A;
            case 66: // B
              return Button.Joypad1B;
            case 82: // R
              return Button.Reset;
            case 83: // S
              return Button.Select;
            case 88: // X
              return Button.Joypad2A;
            case 90: // Z
              return Button.Joypad2B;
            default:
              return null; 
          }
        };

        window.addEventListener('keydown', event => {
          const button = getButton(event.keyCode);
          if (button === null) {
            return;
          }
          nes.press_button(button);
          event.preventDefault();
        }, false);

        window.addEventListener('keyup', event => {
          const button = getButton(event.keyCode);
          if (button === null) {
            return;
          }
          nes.release_button(button);
          event.preventDefault();
        }, false);

        stepFrame();
      };

      // rom load

      let romSelected = false;

      document.getElementById('romSelect').addEventListener('change', event => {
        if (romSelected) return;
        romSelected = true;
        const select = event.target;
        const option = select.selectedOptions[0];
        const filename = option.value;
        if (!filename) {
          return;
        }
        select.disabled = true; // @TODO: Reset Nes instead
        fetch('./' + filename)
          .then(result => result.arrayBuffer())
          .then(start)
          .catch(error => console.error(error));
      });

      window.addEventListener('dragover', event => {
        event.preventDefault();
      }, false);

      window.addEventListener('drop', event => {
        event.preventDefault();
        if (romSelected) return;
        romSelected = true;
        document.getElementById('romSelect').disabled = true; // @TODO: Reset Nes instead
        const reader = new FileReader();
        reader.onload = e => {
          start(e.target.result);
        };
        reader.onerror = e => {
          console.error(e);
        };
        reader.readAsArrayBuffer(event.dataTransfer.files[0]);
      }, false);

      // screen size

      document.getElementById('screenSizeSelect').addEventListener('change', event => {
        const select = event.target;
        const option = select.selectedOptions[0];
        const className = option.value;
        if (!className) {
          return;
        }
        const canvas = document.getElementById('nesCanvas');
        for (const name of ['actual', 'double', 'quadruple']) {
          if (name === className) {
            canvas.classList.add(name);
          } else {
            canvas.classList.remove(name);
          }
        }
      });
    </script>
    
    <div>
      <select id="romSelect">
        <option value="" selected>-- select rom --</option>
        <option value="Super_mario_brothers.nes">Super Mario</option>
        <option value="Tetris.nes">Tetris</option>
      </select>
      or Drag and Drop your own rom file
    </div>
    <div>
      <canvas id="nesCanvas" width="256" height="240"></canvas>
    </div>
    <div>
      <select id="screenSizeSelect">
        <option value="actual" selected>256x240</optioin>
        <option value="double">512x480</optioin>
        <option value="quadruple">1024x960</optioin>
      </select>
      <span id="fpsSpan">--.--</span> fps
    </div>
    <div>
      <table>      
        <tr>
          <td>Down →</td>
          <td>Down</td>
        </tr>
        <tr>
          <td>Left →</td>
          <td>Left</td>
        </tr>
        <tr>
          <td>Right →</td>
          <td>Right</td>
          <!-- <td>6</td> -->
        </tr>
        <tr>
          <td>Up →</td>
          <td>Up</td>
          <!-- <td>8</td> -->
        </tr>
        <tr>
          <td>A →</td>
          <td>A</td>
          <!-- <td>X</td> -->
        </tr>
        <tr>
          <td>B →</td>
          <td>B</td>
          <!-- <td>Z</td> -->
        </tr>
        <tr>
          <td>Start →</td>
          <td>Space</td>
          <!-- <td>-</td> -->
        </tr>
        <tr>
          <td>Select →</td>
          <td>S</td>
          <!-- <td>-</td> -->
        </tr>
        <tr>
          <td>Reset →</td>
          <td>R</td>
          <!-- <td>-</td> -->
        </tr>
      </table>
    </div>
    <div>
      <p>NES Roms Copyright
      <a href="https://github.com/takahirox/nes-rust">NES emulator in Rust</a></p>
    </div>
  </body>
</html>
  • 4. Open our “rust_wasm_demo.html” in browser.
Press “Space” to Start, Press “R” to Reset

Conclusion:

WebAssembly brings the performance of native applications to the web in a way that’s completely secure, yet enabling a full functionality expected from games, major applications and the entire spectrum of software you can run on a computer. WebAssembly is just built as a binary format and very compact to download, and also very efficient to compile and execute. There’s a whole bunch of optimizations coming that will drive that even further, allowing huge mobile applications to load up quickly, even on mobile devices.

Source:

LINEミニアプリ(LINE Mini app)とは?

LINEミニアプリ

現在、スーパーアプリの登場でよりスマホアプリが大転換期を迎えています。
スーパーアプリとは「1つのスマホアプリ内で、サードパーティ製の様々Webアプリを起動できるプラットフォームアプリ 」です。
皆さんが普段利用している「LINE」もスーパーアプリのひとつです。
スーパーアプリの中で起動できるアプリのことを日本では「ミニアプリ」と呼びます。
そんな最中、2019年にLINE株式会社が新たにリリースしたのがLINEミニアプリ(LINE Mini app)です。
しかし、まだまだLINEミニアプリ(LINE Mini app)というサービスを知らない方も多いと思います。
そこで今回は、LINEミニアプリ(LINE Mini app)の出来ることや特徴、機能開発やメリットなどをわかりやすく解説いたします。

ミニアプリ(Mini app)が注目されている理由

最近では、カスタマーサービスの一環として、メンバーズカードやクーポン配信などの機能のネイティブアプリを開発する企業が増えています。
しかし、せっかく開発してもアプリをダウンロードする手間などもあり、企業は宣伝コストをかけてもダウンロードされにくいという課題がありました。
そこで、多くのユーザーが日常的に使用するプラットフォームアプリの中で、DLせずにアプリを利用できるミニアプリ(Mini app)が注目を集めています。

ミニアプリ(Mini app)とネイティブアプリの違い

ミニアプリ(Mini app)と通常のネイティブアプリの一番の違いは、「Apple Store」や「GooglePlay」からのダウンロードが不要なことです。
一般的にアプリは「Apple Store」や「GooglePlay」からダウンロードが必要となりますが、ミニアプリ(Mini app)はその必要がありません。
日常的に使うプラットフォームアプリ(スーパーアプリ)内で、企業が開発するアプリと同じような機能をダウンロード不要で利用することができます。

LINEミニアプリ(LINE Mini app)とは

LINEミニアプリ(LINE Mini app)とは公式アカウントとは別のサービスで、「LINE」上からモバイルアプリのダウンロードを必要とせずにアプリの機能が利用できるサービスです。
2020年7月から一般に開発申請が開始されました。

LINEミニアプリ(LINE Mini app)とLINE公式アカウントの違い

「LINEミニアプリ」と「LINE公式アカウント」は、それぞれ役割が異なります。
「LINE公式アカウント」の場合、友だち登録が必要ですが、「LINEミニアプリ」の場合は友だち登録の必要もなく「サービス」のエリアから通常のWebサイトと同じようにすぐにサービスが利用できます。
「頻繁に利用するがダウンロードするのが手間」「毎回WEBブラウザから起動するのが面倒」というアプリを利用するのに向いているサービスです。
ただし、サービスの利用のみなので、ユーザーへのメッセージの配信はできません。
また、「LINE公式アカウント」は友だちになった利用ユーザーをリピート化させることができます。
メッセージ配信やチャットボットを利用し、自社サービスの利用、商品の購入を販促することができます。
それぞれターゲットが異なるため、どちらかを選ぶというよりは必要に応じて両方の利用をおすすめします。
「LINEミニアプリ」と「LINE公式アカウント」はともにLINEが提供しているLIFF(LINE Front-end Framework)という技術を使用しWebアプリの機能を開発することできます。
組み合わせた使い方としては、下記のようなものがあります。

・「LINEミニアプリ」を利用する際に「LINE公式アカウント」も自動で友だち追加されるように認証設定を行う。
・LINE公式アカウントのリッチメニューから、LINEミニアプリ(LINE Mini app)が起動できるようにする

上記のような使い方をすることで、プッシュ通知等のユーザーに対する発信ができるようになります。
LINE公式アカウントを利用しているユーザーがLINEミニアプリ(LINE Mini app)の存在を知らなかったとしても利用してもらえるきっかけづくりになります。
更に既知のユーザーにとってもユーザビリティ的に利用しやすくなります。

LIFF(LINE Front-end Framework)とは

LINEのトーク画面で、ブラウザを開くことができる機能です。
LINEのトーク画面でブラウザを開くだけならば以前から可能でしたが、そのブラウザを開いているユーザーのLINEのユーザーIDを取得することができます。
つまりLINEのアカウントに紐づけたアンケートの取得などが可能になります。

LINEミニアプリ(LINE Mini app)を使うメリット

ここまではミニアプリ自体の特長を説明してきました。
ここからはLINEミニアプリ(LINE Mini app)の優れているところをユーザー(顧客)側のメリットと企業側のメリットに分けて説明します。
ユーザー(顧客)がLINEアプリ(LINE Mini app)を使うメリット

1. アプリのダウンロードが必要ない
LINEさえあれば利用したいサービスのミニアプリをLINE内で選択するだけで簡単に使用ができます。

2. スマホのホーム画面をすっきりさせられる
ユーザーは自身のスマホのホーム画面には、普段使うアプリ以外は残しておきたくないため、買い物の時などに一時的にダウンロードしたアプリは削除されてしまいます。
LINEミニアプリ(LINE Mini app)であればLINEに集約されるため、そのような心配もなく、すっきりした画面を維持することができます。

3. スマホの容量を圧迫しない
ミニアプリは新たにアプリのダウンロードが不要なためスマホの容量を圧迫しません。

4. ネイティブアプリに近い機能が利用できる
LINEミニアプリ(LINE Mini app)は、企業や店舗が提供している予約フォームやクーポン、ポイントカード、お支払い機能、お知らせ機能、などのサービスをLINEのプラットフォーム内で使うことができます。

企業がLINEミニアプリ(LINE Mini app)を使うメリット

ユーザーメリットだけでなく、企業にとってもミニアプリで開発することは大きなメリットがあります。

1. 約8,900万人のアクティブユーザーが利用しているため自社サービスの展開が容易で使用してもらいやすい
ユーザーのメリットでLINEミニアプリは簡単に使用できると記載させていただきましたが、それ自体が企業にとってのメリットの一つになります。
LINEミニアプリ(LINE Mini app)自体利用ハードルが低く削除されにくいだけでなく、アプリも自動バージョンアップされるためユーザーにとっての負担も少なくなります。

2. ユーザーにメッセージ配信しやすく圧倒的な開封率・既読率でユーザーの反応が分かりやすい
通常のネイティブアプリの場合、ダウンロード後に削除される可能性があるためプッシュ配信が届きにくい問題がありました。
LINEミニアプリ(LINE Mini app)とLINE公式アカウントを連動させれば、開封率が100%近く既読率がメルマガと比べ遥かに高く圧倒的に読まれやすいLINEのメッセージ配信を行うことが可能になります。
これまで、DMやメルマガでユーザーにしっかりと届いたか、どのような反応があったかイマイチ分かりづらかったというケースが多くありましたが、LINEミニアプリ(LINE Mini app)の活用により相互コミュニケーションの活性化が期待できます。

3. ネイティブアプリに比べ開発費用抑えることができる
ネイティブアプリの場合、iOSとAndroidの両方を開発する必要がありますが、LINEミニアプリ(LINE Mini app)の場合LINEプラットフォームに対応するように1つのwebアプリを開発すれば済むので、開発費を約半額に抑えることが出来ます。
またアップデートも自動で反映されるためアジャイルなアプリ開発にも向いています。

4. 課金型のサービスの場合、30%の手数料がかからない
アプリ上で課金が発生する場合iOSとAndroidともに売上の30%の手数料がかかります。
LINEミニアプリ(LINE Mini app)の場合はかからず、企業側はクレジットカードでもLINE Payでも、自社で自由に決済手段を設定することが出来ます。(※決済事業社が設定する通常の決済手数料はかかります)

ミニアプリの今後の展望

今後、スーパーアプリが盛り上がりを見せ、ますますLINEミニアプリの需要は向上していくと考えられます。
ただし、ネイティブアプリという存在は決して消えるわけではありません。
今後は、状況やターゲット、より高度な機能をアプリに盛り込む際には必要になってくるため、各企業に合ったアプリの活用法を検討し利用していく必要があるがあります。

まとめ

ここまでLINEミニアプリ(LINE Mini app)について簡単にまとめてみましたが、いかがでしたでしょうか?
SNSの中でもLINEならインストールされている・できるという方は多いと思います。
LINEの月間アクティブユーザー数は、約8,900万人、日本の人口の70%以上が利用しているSNSだからこそ、LINEミニアプリ(LINE Mini app)のサービス提供は価値があると言えるでしょう。
LINEミニアプリ(LINE Mini app)のサービスはまだ提供を開始したばかりで、その存在や名称、仕組みなどを知らないという方がほとんどです。
しかし、そんな今だからこそ、企業はLINEミニアプリ(LINE Mini app)を取り入れて、他社との差別化を図り一歩リードしようとしています。

以下に今回の要点を簡単にまとめました。

・LINEミニアプリ(LINE Mini app)はLINEからアプリを起動できる新しいサービス
・ユーザーはアプリのダウンロードが不要で、友だちに追加するだけで利用できる
・企業はメッセージ配信しやすく課金型のサービスの場合、30%の手数料がかからない
・ 今後は多くの企業でLINEミニアプリ(LINE Mini app)の開発と活用が進んでいくことが予想される

LINEミニアプリ(LINE Mini app)はまだまだ新しいサービスのため、開発会社や開発事例は多くありません。
現在は、LINE公式パートナーを通さない形でもLINE社の審査を通れば開発することが可能です。
WeCodeでは、LINE公式アカウント/LINEミニアプリ(LINE Mini app)の開発実績と豊富なノウハウがございます。
LINEミニアプリの開発を検討されている方や要件がはっきりしていないがミニアプリを開発したいという方はお気軽にWeCodeにご相談ください。

Source:

Amazon EKS — Managed Kubernetes Service from AWS

Amazon Elastic Kubernetes Service (Amazon EKS) is a managed service that makes it easy for you to run Kubernetes on AWS without needing to stand up or maintain your own Kubernetes control plane. Kubernetes is an open-source system for automating the deployment, scaling, and management of containerized applications.

Amazon EKS runs Kubernetes control plane instances across multiple Availability Zones to ensure high availability. Amazon EKS automatically detects and replaces unhealthy control plane instances, and it provides automated version upgrades and patching for them.

Amazon EKS is also integrated with many AWS services to provide scalability and security for your applications, including the following:

  • Amazon ECR for container images
  • Elastic Load Balancing for load distribution
  • IAM for authentication
  • Amazon VPC for isolation

How it works?

EKS Architecture for Control Plane & Worker node:

EKS Benefits:

  • High Availability
  • Serverless option (AWS Fargate)
  • Secure
  • Built with the Community

Let’s create our first EKS cluster:

  1. Select AWS EKS Service

2. Create cluster and enter General configuration.

3. Select VPC and Security details

4. Confirm and create cluster. It may take up to 5mins. Coffee Break ☕️

5. Our cluster is ready for usage.

EKS Pricing:

You pay $0.10 per hour for each Amazon EKS cluster that you create. You can use a single Amazon EKS cluster to run multiple applications by taking advantage of Kubernetes namespaces and IAM security policies. You can run EKS on AWS using either EC2 or AWS Fargate, and on premises using AWS Outposts.

Accessing api-server using kubectl:

Unauthorized Server Error — Solution:

Clean Up: Don’t forget to delete cluster.

Thank you for reading. 

Source:

Implementing “Andon (行灯)” in DevOps

Let’s first understand the meaning of Word “Andon (行灯)” in Japanese,

Andon(行灯) means — fixed paper-enclosed lantern; paper-covered wooden stand housing an (oil) lamp​

Dictionary — https://jisho.org/search/行灯

Toyota Production Systems (TPS) has introduced the word “Andon”. “Andon Cord” is a Lean manufacturing principle and tool used to notify management, maintenance, and other workers of a quality or process problem. The concept revolves around a device incorporating signal lights to indicate which assembly line workstation has a problem. Normally alerts are activated manually by a worker using a pull cord (Andon cord) or button or may be activated automatically by the production equipment itself. The idea behind is that by stopping the system you get an immediate opportunity for improvement, or find a root cause, as opposed to letting the defect move further down the line and be unresolved.

In the case when Ignored, In Steven Spear’s “The High-Velocity Edge”, he describes a horrifying story of missed opportunities leading up to the 2003 NASA Columbia space shuttle disaster. The short version of the story is that the thermal protection system on the left wing was damaged just after launch but didn’t become an issue until reentry 19 days later. After the disaster, an investigation board charged with reviewing the accident found there were at least eight attempted signaling events to notify the crew requesting that they need to “go-see” the damage, But nothing is done which led to disaster.

Now, what The Andon Cord means in Software Development?

During development, bugs are talked about openly, but the project moves forward regardless, and the bugs continue down the process.

This is where DevOps comes in and can incorporate the Andon Cord concept. There are two specific areas that come to mind, first, if an organization has truly flipped the testing pyramid and put full automated testing in place in conjunction with Continuous Integration, Specification by Example and a tool such as SonarQube, this can be the first place the Andon Cord concept can be employed. By forcing all new code to run the gauntlet of full automated testing (driven by Specification by Example) and SonarQube’s quality gates you are making sure it meets the expected behaviors specified by the customer and the code quality is in line with expected standards.

The second area DevOps can function as a sort of Andon Cord is with A/B Testing. When an organization has put into place a fully automated delivery pipeline they are able to quickly get code out to subsets of their customers (often the same day the code was developed) in order to create Feedback Loops that enforce that they are building what their clients want.

Are any industry giants really using it? Answer, YES.

Amazon and the Cord :

The Andon Cord has become a metaphor for some modern-day Web-Scale organizations as well. Jeff Bezos, the CEO of Amazon, described in a 2013 letter to the Amazon’s shareholders a practice he called the Customer Service Andon Cord. This was an established practice of metaphorically pulling an Andon Cord when they noticed a customer was overpaying or had overpaid for a service. Amazon would heuristically scan their systems looking for these kinds of potential customer service mismatches. These were considered defects at Amazon because they had a vision of being an organization that was always customer-centric. They would automatically refund a customer, without the customer even asking, if the service delivery was suboptimal. I have had this happen to me on a few occasions watching a movie on Amazon Prime, where the next day I received an email telling me they refunded my movie rental cost due to poor quality.

Netflix and The Chaos Cord :

Another example of an Andon Cord metaphor used in Web-Scale businesses is at Netflix. Netflix has an interesting way of exercising their Andon Cord, although they don’t actually call it an Andon Cord.

At Netflix, they actually inject this into their systems on purpose by intentionally trying to break systems in production. They have developed what is now famously called Chaos Monkey. Chaos Monkey is a process that randomly kills live running production servers. This behavior is known by everyone who works at Netflix. It’s part of their culture. There are no surprises about this practice. Developers plan their code and systems accordingly. As Told by Adrian Cockcroft, one of the primary architects behind Netflix’s IT infrastructure, that not knowing about the Chaos Monkey mode coming into a job interview at Netflix was pretty much an immediate no-hire decision.

Summary,

— NO permission needed to pull cord (open to everyone)

— DO NOT bury down an issue in useless paperwork and never-ending meetings (Act with priority)

— NO defect was too small

— Even if the cord was mistakenly pulled, the response should never be negative. (Build Trust)

— It’s not a tool that matter but culture and behavior behind the tool are important (Build Culture)

— Solving problem is NOT the goal, understanding how to solve the problem is a Goal.

Furthermore, the process of solving the issues can be controlled by a practice described by Dr. Edwards Deming called Plan Do Change Act (PDCA). PDCA loop. Plan (P) a countermeasure, implement the countermeasure (D), check or study the results (C), and act on the results either it’s fixed or start the next countermeasure (A).

Another point here is that implementing an Andon Cord in an organization is not something you do overnight. It takes a continuous improvement roadmap to get there and must have behavior reinforcement built into the process. It takes a fierce commitment and practice of improvement and an equally skilled leadership coaching approach. If you want to investigate the concept more deeply, recommend book — Mike Rother’s “Toyota Kata”.

Last but not least,

Do we need an actual physical device, maybe not. We can have mail or slack which virtually works as an “Andon Cord”. Personally, I would like to do a small DIY Project “Andon using Raspberry Pi 3”, which is basically building small and easy Andon cord using Raspberry Pi 3, so that the team can access it through the web and signal the problems. I will work on this and I will share implementation details in another blog.

Source:

Overview of GitOps

What is GitOps? Guide to GitOps — Continuous Delivery for Cloud Native applications

GitOps is a way to do Kubernetes cluster management and application delivery. It works by using Git as a single source of truth for declarative infrastructure and applications, together with tools ensuring the actual state of infrastructure and applications converges towards the desired state declared in Git. With Git at the center of your delivery pipelines, developers can make pull requests to accelerate and simplify application deployments and operations tasks to your infrastructure or container-orchestration system (e.g. Kubernetes).

The core idea of GitOps is having a Git repository that always contains declarative descriptions of the infrastructure currently desired in the production environment and an automated process to make the production environment match the described state in the repository. If you want to deploy a new application or update an existing one, you only need to update the repository — the automated process handles everything else. It’s like having cruise control for managing your applications in production.

Modern software development practices assume support for reviewing changes, tracking history, comparing versions, and rolling back bad updates; GitOps applies the same tooling and engineering perspective to managing the systems that deliver direct business value to users and customers.

Pull-based Deployments

more info @ https://gitops.tech

The Pull-based deployment strategy uses the same concepts as the push-based variant but differs in how the deployment pipeline works. Traditional CI/CD pipelines are triggered by an external event, for example when new code is pushed to an application repository. With the pull-based deployment approach, the operator is introduced. It takes over the role of the pipeline by continuously comparing the desired state in the environment repository with the actual state in the deployed infrastructure. Whenever differences are noticed, the operator updates the infrastructure to match the environment repository. Additionally the image registry can be monitored to find new versions of images to deploy.

Just like the push-based deployment, this variant updates the environment whenever the environment repository changes. However, with the operator, changes can also be noticed in the other direction. Whenever the deployed infrastructure changes in any way not described in the environment repository, these changes are reverted. This ensures that all changes are made traceable in the Git log, by making all direct changes to the cluster impossible.

In Kubernetes eco-system we have overwhelming numbers of tools to achieve GitOps. let me share some of the tools as below,

Tools

  • ArgoCD: A GitOps operator for Kubernetes with a web interface
  • Flux: The GitOps Kubernetes operator by the creators of GitOps — Weaveworks
  • Gitkube: A tool for building and deploying docker images on Kubernetes using git push
  • JenkinsX: Continuous Delivery on Kubernetes with built-in GitOps
  • Terragrunt: A wrapper for Terraform for keeping configurations DRY, and managing remote state
  • WKSctl: A tool for Kubernetes cluster configuration management based on GitOps principles
  • Helm Operator: An operator for using GitOps on K8s with Helm

Also check out Weavework’s Awesome-GitOps.

Benefits of GitOps

  1. Faster development
  2. Better Ops
  3. Stronger security guarantees
  4. Easier compliance and auditing

Demo time 😄 — We will be using Flux

https://github.com/fluxcd/flux

Prerequisites: You must have running Kubernetes cluster.

  1. Install “Fluxctl”. I have used Ubuntu 18.04 for demo.
sudo snap install fluxctl 

2. Create new namespace called “flux”

kubectl create ns flux

3. Setup flux with your environmental repo. We are using repo “flux-get-started”.

export GHUSER="YOURUSER"
fluxctl install \
--git-user=${GHUSER} \
--git-email=${GHUSER}@users.noreply.github.com \
--git-url=git@github.com:${GHUSER}/flux-get-started \
--git-path=namespaces,workloads \
--namespace=flux | kubectl apply -f -

4. Set Deploy key in Github. You will need your public key.

fluxctl identity --k8s-fwd-ns flux

5. At this point you must have following pods, Services running on your cluster. (In “flux” and “demo” namespace)

namespace: flux
namespace: demo

6. Let’s test what we have deployed.

kubectl -n demo port-forward deployment/podinfo 9898:9898 &
curl localhost:9898

7. Now, lets make small change in repo and commit it to master branch.

By default, Flux git pull frequency is set to 5 minutes. You can tell Flux to sync the changes immediately with:

fluxctl sync --k8s-fwd-ns flux

😃 Wow ㊗️ our changes from our repo has been successfully applied on cluster.

Let’s do one more test, assume that by mistake someone has reduced/deleted your pods on production cluster.

By default, Flux git pull frequency is set to 5 minutes. You can tell Flux to sync the changes immediately with:

fluxctl sync --k8s-fwd-ns flux

You have successfully restored your cluster in GitOps way. No Kubectl required!!

Whenever the deployed infrastructure changes in any way not described in the environment repository, these changes are reverted.

Thank You for reading.

Source:

Why, What and How of — Backends For Frontends (BFF)

Before we begin Let’s clear some basic understanding about Microservices,

What is microservices?

The microservice architectural style is an approach to developing a single application as a suite of small services, each running in its own process and communicating with lightweight mechanisms, often an HTTP resource API.
These services are built around business capabilities and independently deployable by fully automated deployment machinery. There is a bare minimum of centralized management of these services, which may be written in different programming languages and use different data storage technologies.

Principles of microservice architecture:

  1. Scalability
  2. Availability
  3. Resiliency
  4. Independent, autonomous
  5. Decentralized governance
  6. Failure isolation
  7. Auto-Provisioning
  8. Continuous delivery through DevOps

Backend For Frontend (BFF) ?

The BFF is tightly coupled to a specific user experience, and will typically be maintained by the same team as the user interface, thereby making it easier to define and adapt the API as the UI requires, while also simplifying process of lining up release of both the client and server components. — Sam Newman

Why we need BFF & What problems we are solving?

Context:

Imagine we are building an online store that uses the Microservice architecture and that we are implementing the product page.
We need to develop multiple versions of the product details user interface:

  • Web
  • Mobile
  • Tablet
  • 3rd Party Integration API

Since our online store uses Microservices architecture, Our user interfaces are calling multiple services for the information.

Situation:

  1. The granularity of APIs provided by microservices is often different than what a user interface needs.
  2. Different user interface need different data. For example, the web browser version of a product details page is typically more elaborate then the mobile version.
  3. Network performance is different for different types of user interface.
  4. Partitioning into services can change over time and should be hidden from user interfaces.
  5. Services might use a diverse set of protocols.

Solution:

A BFF is created as an interface between each API consumer and a shared API or data resource. The BFF implements API logic that is specific to that particular application. It’s essentially a translation layer that ensures data is transformed specifically to suit the needs of that particular client. Clients might be using multiple APIs, in which case, the BFF can also act as an API gateway that is defined just for a single application. It will perform the task of aggregating and combining all the data from a set of APIs into a common format that is convenient for the client.

What are the benefits of this? Firstly, it’s easier to adopt the API as UI requirements change. As a frontend developer, now instead of having to wait for the API team to create a particular endpoint for you or integrate a new field, or a new set of data, you now have the power to just go ahead and make those changes yourself. It also simplifies the process of lining up server and client releases. Now that one team manages both the UI and the API, there’s no longer coordination that has to happen between a frontend and a backend team. Thirdly, because it’s focused, the BFF API will be smaller than the shared single purpose API. It’ll probably be easier to understand and navigate and will probably have smaller payloads if it’s a REST API. Finally, you’re able to aggregate multiple calls to downstream APIs into a single call to the BFF, which is a lot simpler and often more performant.

  • An API Gateway/BFF is the single point of entry for any microservice call.
  • It can work as a proxy service to route a request to the concerned microservice, abstracting the producer details.
  • It can fan out a request to multiple services and aggregate the results to send back to the consumer.
  • One-size-fits-all APIs cannot solve all the consumer’s requirements; this solution can create a fine-grained API for each specific type of client.
  • It can also convert the protocol request (e.g. AMQP) to another protocol (e.g. HTTP) and vice versa so that the producer and consumer can handle it.
  • It can also offload the authentication/authorization responsibility of the microservice.

One or More BFF?

so how many BFF(s) should you go for? The BFF pattern recommends building one API per client. That means that each frontend essentially has its own custom API, which is built and maintained by the same team as the frontend.

Conclusion:

BFF offers a good way to enable teams building different client-facing apps to be in charge of their own destiny. This autonomy is crucial to iterate quickly on the client apps and deliver good experience/features fast. By supporting change, BFF supports evolutionary design and moves the whole system into a better, less-coupled state and then a big single purpose API.

Thank you for reading 🙂

Source:

Design a site like this with WordPress.com
Get started